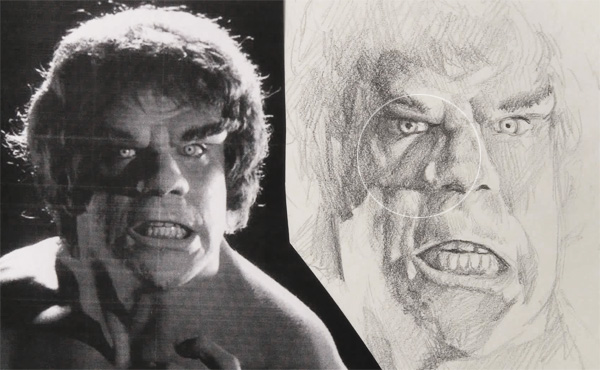
Hi everyone. I wanted to record a video showing a quick sketch of Lou Ferrigno as the Hulk. I had placed my video camera above me and the drawing. Only after I have finished recording what I wanted to show, did I realized that my head was in the way of the camera=). What a stupid thing to do. I guess that is all trial and error for a newbie like me. Here’s how the video looked.
So in order to actually show the sketching process again, I continued on to the right side of the drawing. Which is the video you see at the bottom of this post. The proportions on the face are off from the reference as I drew it rather quickly. Had I wanted to look exactly like the reference, I would have used a lightbox to trace the main features. Yes, I do trace! And most artist do too. But that’s another story, we’ll talk about that another time.
What I really wanted to talk about is how you can render the shadow areas. One of the things that makes a drawing artistic and more captivating is the liberty that an artist can take with it. Instead of drawing it as you perfectly see it in real life or from reference, you can make it more interesting. One way to achieve that is how you render the shadow areas. On the picture of the Hulk reference and sketch, look specifically at the shadow that is cast by the nose. In the reference, it is completely dark as the photographer intentionally removed any kind of bounce light on that area. But on the sketch, I left the shadow areas lighter than the edge of the shadow. This makes the sketch more artistic and less realistic. You will see this method on many other drawings by other artist. They rarely fill in the shadow areas completely dark, unless it is a specific dramatic feeling they want to achieve. Give it a try the next time you are sketching dark shadow areas.
Here is the video for the remainder of the drawing. The video is played at 4 x the actual speed.
Do you find this kind of video useful?

